Sunday, June 22, 2014

Mini Houses

This week for the blog hop the Imagine If Design team have been working on a set of mini houses and a little church. To start the hop begin with Jo's gorgeous project and then follow the blogs posts to see what the rest of the team has been up to.  Once again there will be a giveaway of Imagine If products for one lucky person. Just comment on one or all of the blogs, one comment per blog will give you nine chances to win.  Enter the draw by using the rafflecopter box at the bottom of each post.

Start at the beginning with Jo's gorgeous creations and follow the links to the other blogs
Check out Carols wonderful mini houses then pop over to see what Tash has been up to.
Tash has made some stunning little houses


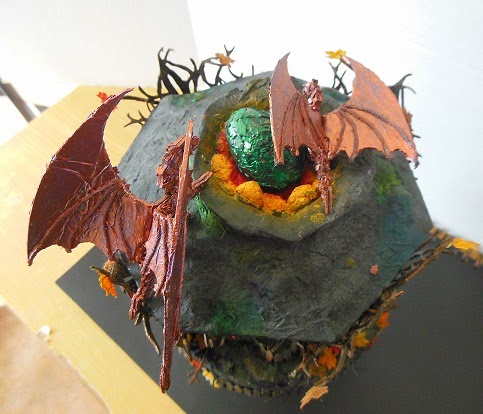
Here is my project for this week's theme.  I knew that I wanted to keep the houses together and I also wanted to use up the gorgeous moon with the bats and clouds that Jo had sent me in the design team package.  I couldn't work it into the merry go round or the pdf house last week so I was determined to use it this week.  I also wanted to incorporate the mini, mini houses that Jo also sent in the Design Team project.  These come in a 12" strip and would be perfect for a layout, but as usual I did not take the usual route.  I decided to create a little stand for my houses and church that I could decorate with the moon and mini, mini house strip.  I added (what else) drawers (lol) and because I wanted the project to be functional I made two small albums from recycled books that would fit into the large box part of the project.  So here is my finished project.


I began by making a stand out of matt board and papier mache.  I then painted it black and then blue. While the blue paint was wet I dabbed it with scrunched up newspaper to give it a bit of texture. 


Then using the Imagine if "Rain" stencil I stencilled on the clouds and the raindrops using grey paint.  The impression I was going for was a cold wet, windy evening. 


I then began decorating the box by using chipboard elements from Imagine If.  The mini mini houses, the moon, bats and clouds, bare trees, cats and a rabbit I had left over from the enchanted Forest merry go round.   I painted the houses and trees and I used aluminium tape (my favourite product) for the roofs.  I painted a piece of dictionary page yellow and used that to put to behind the windows of the houses.  I wanted it to look like the lights were on and everyone was warm and cosy inside on a wet night. 


I then decorated the mini houses. One one I used the crackle paint technique, on the other I used a brick embossing folder and on the barn I used strips of card to emulate wooden slats.  I made each of them a chimney as they do not come with chimneys, don't you just love the little mushroom type chimney.  Again I used aluminium tape for the roofs on two of the houses but for the barn I used small squares to emulate tiles.   I added a weathervane to the roof of the barn.  I then added the doors and windows and some plants so that they did not look too barren. 


 I painted the church using white gesso and tissue paper to give the effect of stone, then painted it with black and grey paint.  I used German scrap strips on the roof of the house and the steeple.  I added a bell to the steeple and a cross and again some plants and some trees to give it a bit of interest. 


I then glued them to the base, added some Imagine If chipboard fence and some die cut flowers, made some drawers and pit it all together.

Once the main part was completed I took two Readers Digest books and took the pages out leaving the covers.  I covered the books and made signatures which I then sewed into the covers.


On putting the albums into the box I realised that one they were a snug fit and hard to get out and two that I had not left enough room between the spines and the lid to put a handle of some kind on the spines to lift the albums out.  So necessity being the mother of invention I added chains the to the spines that were not only decorative but could also be used to pull the albums from the box.


And there it is my finished village all snug and tight on a stormy evening.  To give it a bit of stability and just to finish it off really I glued the whole thing to a book.

The thing that I like about the Imagine If chipboard is that it can stand a lot of abuse and handle paint, paper and other mediums really well.  Once it is a bit damp it can also be shaped really well. 

I hope you have enjoyed looking at my take on the mini houses and I really hope that you feel inspired to try these products and come up with your own village or individual house or church.  If you have any questions on any of the techniques I have used please feel free to ask and I will be only too happy to help.

Till next time, Ngaere

Imagine If products used

Moon. bats and cloud
Bare trees
Mini, mini house strip
Cat
Rabbit
Fences
Mini houses
Rain stencil


a Rafflecopter giveaway

Sunday, June 15, 2014

Baba Yaga House

Hi everyone here I am back again with another project using the fabulous mini mdf house from Jo at Imagine If.  Once again we are doing a blog hop this week so please pop over and check out the Imagine If blog to start at the beginning or pop over and visit some of the other design team members.  They have all made stunning houses and once again they are all different.


Check out what Jo has been making on her blog
Beth has made an artist's cottage complete with easel
Brenda's house even has room for a dog, check it out


Jo is running another giveaway this week so go the rafflecopter at the end of the post, leave comments on the blogs and go in the draw to win an amazing prize.


 I started with the basic house but as usual I went off on my own tangent.  (this is becoming a recurring theme)  I looked at the house and Jo had said that she wanted something a bit different so here it is.  I have always been intrigued by the house of Baba Yaga.  In Russian folklore she is a witch/wise woman who lives in a house on chicken legs.  So here is my take on this house.  I modified the back of the house and added drawers as well as the chicken legs.


Once again there are too many instructions for the project so I will just explain a few of the techniques used.

I cut out a part of the back of the house and added in matchboxes glued together to make the drawers in the back.


I then made faces for the drawers using mini popsicle sticks and painted them to match the house and added a knob.
 
I added images to the inside of the drawers in keeping with the witchy theme.


To get the look of timber on the house I used mini popsicle sticks which I glued on to the pices of the bilding.  I then trimmed them and painted the whole thing black.  Once the black paint was dry I covered the pieces with crackle medium and then brown paint.  I wasn't too fussy about the sticks and used broken bits to give the appearance of a weathered old wood cabin.


The chicken legs I made using a wire armature that I made and then I used paper mache to give them the strength to hold the house.  I then attached them to the bottom of the house using glue and more paper mache.
 
For visual interest I made a little bookshelf with some bit on it that can be seen through one of the windows.  The other window and the door have images behind them.


The base the legs are attached to is actually four wooden coasters glued together.  I wanted something with a bit of weight so that the house would not tip over.
 
Here are a couple of more images of the completed house.  I am really pleased with how this turned out and if you have any questions please do not hesitate to ask, I am only too happy to answer them.  Please let me know what you think I love to get your feedback.


 Have a good day, Ngaere.


a Rafflecopter giveaway

Monday, June 9, 2014

Enchanted Forest Merry Go Round

I am really excited to be bringing you the latest Design Team project from Imagine If.  Jo sent us out chipboard Merry Go Rounds/Carousels.  The Design Team have done an awesome job assembling and decorating these so please check out the blogs to see the all of the finished projects. We are doing a blog hop this month and also a giveaway.  All of them are very very different and very very gorgeous.

Jo at Imagine If has made a NZ themed Merry Go Round
Brenda has made a fun boy's Merry Go Round
Katrina has made an amazing Christmas Merry Go Round

Jo is giving away an undecorated Merry Go Round with horses to everyone who leaves a comment on the blogs.  If you want lots of chances to win enter a comment on every single blog and be in to win. Click on the rafflecopter link at the bottom of this post to leave your comments.

 As usual I have taken a walk on the dark side for my project.  I am not going to give a step by step tutorial for this project as it is too big so I will just hit the highlights.  Here is the final project made with the fantastic chipboard pieces provided by Jo at Imagine If.


The Carousel does not come from Jo with a slide out drawer I made that myself while assembling the pieces.  I thought it would be nice to add a little album so I cut out  a piece of the base and using mat board I cut sides and a back piece and glued them to the inside of the base.


I then cut a base and sides and attached them to the front piece of the base that I had previously cut away to make a pull out drawer.  I did not put a back on the drawer as the mini album is glued to the bottom of the drawer and the spine serves as a backing piece. The album opens from within the drawer.


The other thing I changed was the roof of the Carousel.  If you check out the other blogs you will see that the roof comes to nice point.  I wanted dragons to nest on my roof so I cut out a circle from the top of the roof.  I then assembled the roof and put a piece of egg carton inside the hole I had made.  Using white gesso and tissue paper (the kind you use for colds) I then covered the whole roof and "nest". I also wet the tissue with the gesso and rolled it into rough balls to make the "rocks" for the inside of the nest. I also used clumps of tissue soaked in gesso to give the roof some lumps and texture.  I wanted the roof to resemble a mountain top. 


Once the gesso was dry I used various paints and sprays to colour the roof and I made a dragon egg using a plastic egg and crushed eggshell to sit inside the nest.


While the roof was drying I went on to decorate my chipboard dragons.  Firstly I painted the dragons black then I covered the wings with modge podge and tissue paper.  The tissue I used here is the type used to wrap presents not the "blow your nose" kind that I used on the roof.  This method gives the appearance of leather when it is painted and that is the effect I wanted for the wings of my dragons. I added pieces of string on the wings to make veins in the wings and set it all aside to dry.


Deciding I wanted some texture on the body of the dragons as well I glued crushed eggshell to the chipboard and when everything was dry I trimmed the wings and I painted the whole thing with metallic paint. Here you can see the "leathery" texture of the wing.


I then glued the two sides together and folded the wings to get my 3D dragons.  the great thing about the chipboard that Jo supplies is that is very easy to manipulate into shape and it does not fall apart.  Here are the finished dragons.


Once the roof was done I stencilled tissue paper with a branch stencil then wrapped it around the central pillar of the Carousel.  I then built up the graveyard around the pillar, using more of Jo's chipboard elements.  I used gravestones, an owl, bats, branches, birds. a cat and pumpkins.  I then enclosed it all in a die cut fence.


I used tissue and gesso on the base of the Carousel and then once it was painted I put it together with the roof.  I used bamboo skewers inside straws as the supports for the roof.  The straws were covered in tissue paper and gesso and then I glued chipboard trees to the front.  I punched out leaves from paper towels I have previously used to mop up excess distress ink from another project.  These I glued to the branches and dropped around the base of the tress along with bits of branches.  I then painted up some mice and rabbits, made a sign telling the unwary to keep out added a base to the whole thing, a drawer pull for the mini album and the whole piece was finished.  Whew.  Whether you want to walk on the dark side or try one of the beautiful carousels decorated by the other members of the Imagine If design team this is an amazing project and it is so easy to put together and the sky is the limit when decorating it especially with the huge range of chipboard elements Jo has available.  I urge you to check out the other blogs you will be blown away.

Till the next time, Ngaere.


a Rafflecopter giveaway